Smart Software Manager On-Prem
Smart Software Manager On-Prem (Satellite Enhanced)
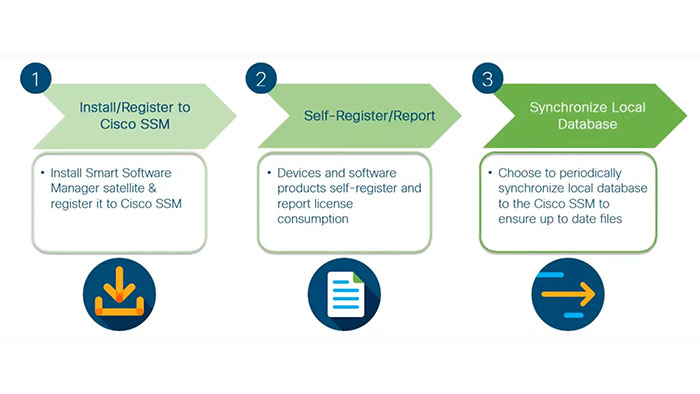
Cisco Smart Software Manager satellite (SSM satellite) is a Smart Licensing solution that allows customers to administer products and licenses on their premises, as a replacement for having direct connection to Smart Licensed enabled product instances to Cisco Smart Software Manager hosted on cisco.com.
Cisco Smart Software Licensing works in combination with the cloud-based Smart Software Manager (SSM) and is perfect for clients who have strict security obligations, hence do not want any of their products to communicate with central licensing over direct internet connection.
These following items are benefits of Cisco SSM Satellite:
- Secure on-premise single source of truth of license consumption
- Near real-time license entitlement based on synchronization schedules with backend install base
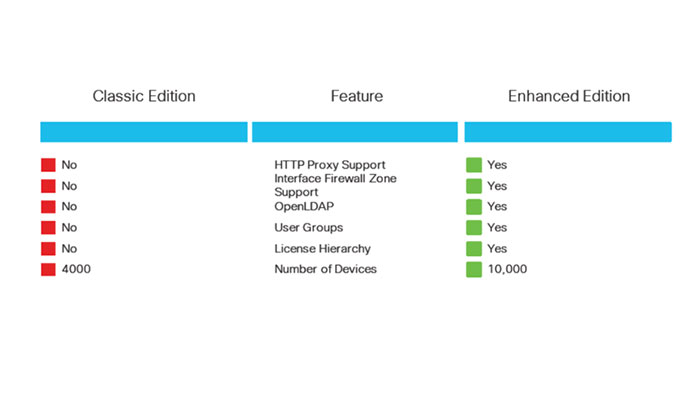
SSM Satellite Classic vs. On-prem
| SSM Satellite Classic Edition |
SSM Satellite Enhanced Edition |
- Single Tenant – one customer (represented by a Smart Account).
- 90-day Sync Requirement
- 4K device scalability (10K with satellite 5.1)
- Cent OS code base with similar UI as CSSM
- Single User Role with single authentication
methods (local database only)
|
- Targeted for medium and large Enterprise, Service Providers and Partners
- 364-day Sync Requirement
- License Hierarchy, Syslog, Proxy, etc.
10K with version 6.0, grow to 500K device
scalability
|
Smart Software Manager
Software Packaging Required
Following components are needed for your installation package of the universal ISO for Cisco Smart Software Manager satellite:
- Centos 7
- Smart Software Manager Satellite Enhanced Edition
Scalability and System Limits
Cisco Smart Software Manager satellite (SSM satellite) is able to support Up to 500 local Accounts, Up to 1,000 local Virtual Accounts and Up to 10,000 product instances.
Supported Web Browsers
The following web browsers are supported:
- Chrome 36.0 and later versions
- Firefox 30.0 and later versions
- Internet Explorer 11.0 and later versions
System Requirements
Certify that you have access to a local Cisco Smart Account Access before you proceed with the following tasks.
Hardware based deployment requirements:
The Cisco Smart Software Manager Satellite Enhanced Edition can be deployed on physical servers, such as the Cisco UCS C220 M3 Rack Server, or on Virtual servers which meet the following requirements:
Minimum:
- 200 Gigabyte Hard Disk
- 8 Gig RAM
- x86 Dual Core
- 1 Ethernet NIC
Recommended:
- 200 Gigabyte Hard Disk
- 8 Gig RAM
- x86 Quad Core
- 2 Ethernet NIC
Manually Creating VM Using the .iso File (VMware ESXi)
- Import the software package into the VM.
- In the vSphere client, select Create a New Virtual Machine option.
- Under Configuration, select the option to create a Custom configuration, and click Next. Under Name and Location, specify the name for the VM and click Next.
- Under Storage, select the datastore to use for the VM. Click Next.
- Under Virtual Machine Version, select Virtual Machine Version 8. Click Next.
- Under Guest Operating System, select Linux and the “Other 2.6x Linux (64-bit) setting” from the drop-down menu. Click Next.
- Under CPUs, select the following settings: 2 or 4 Cores. The number of cores per socket should always be set to 1, regardless of the number of virtual sockets selected. For example, a 4-vCPU configuration should be configured as 4 sockets and 1 core per socket.
- Under Memory, configure the supported memory size for your deployment.
- Under Network, allocate at least 1 virtual network interface cards (vNICs).
- Under SCSI Controller, select LSI Logic Parallel. Click Next. Under Select a Disk, click Create a new virtual disk
- Under Create a Disk, configure for a minimum of 200 Gig
- In the Hardware tab, click New CD/DVD Drive.
- Mount the software package from Step 2
- Boot the Virtual Machine
Cisco SSM On-Prem Installation
The following steps shows the satellite installation workflow to install an ISO image:
- Download the ISO image
- Deploy ISO per your Orchestration Environment
- Add the information requested on the Cisco SSM satellite EE Kickstart Installation UI
- Enter Hostname
- Select System Profile
- System Classification – The options are default Unclassified, Confidential, Secret, Top Secret. If you choose the option, this classification shows up on the console Message of the Day banner.
- Security Content Automation Protocol (SCAP Profile) – Not changeable
- FIPS 140-2 Mode – Not changeable
- Disk partitioning – User defaults
- Click on “Network Configuration”
- Enter IPv4 and/or IPv6 network values per your network environment. Required values are:
- Address
- Netmask / Prefix
- Gateway
- Configure DNS
- Click OK
- Click OK
- The Popup for Configure System Password will be displayed. Enter a secure Linux SSH password for SHELL access. (Note: This is different than the UI admin password. Please keep in a safe location as there is no password recovery option.)
- Reenter the Password
- Click OK
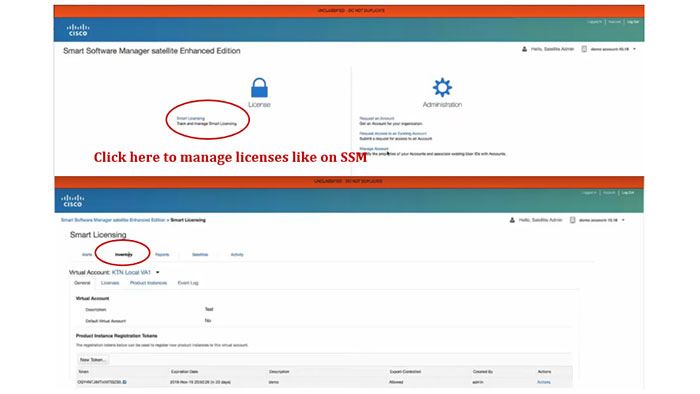
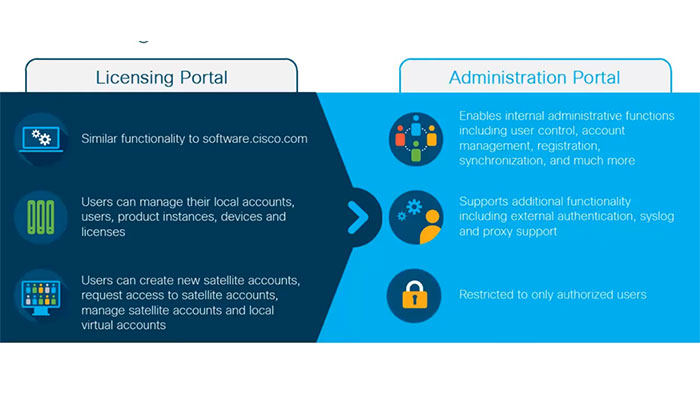
Cisco SSM On-Prem Portals
After Cisco SSM satellite installation, you can find two kind of portals included:
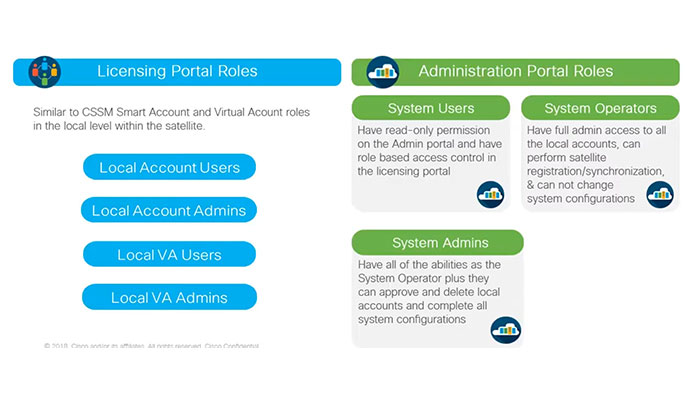
Cisco SSM On-Prem Licensing and Administration Portal Roles
You can access different features in single portal which is mentioned in figure below:
Smart Software Manager
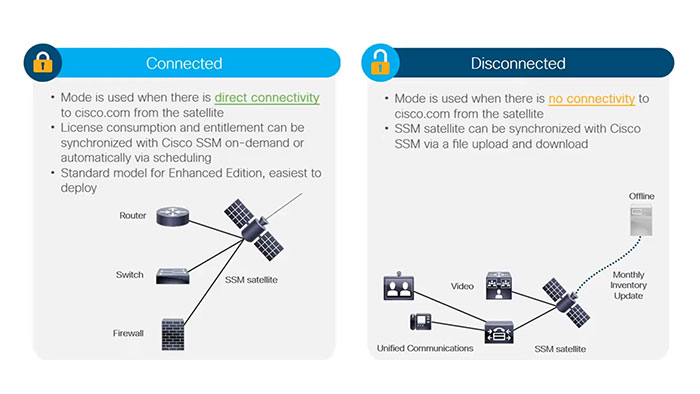
Deployment Modes
Cisco SSM Satellite Enhanced can be deployed in following methods:
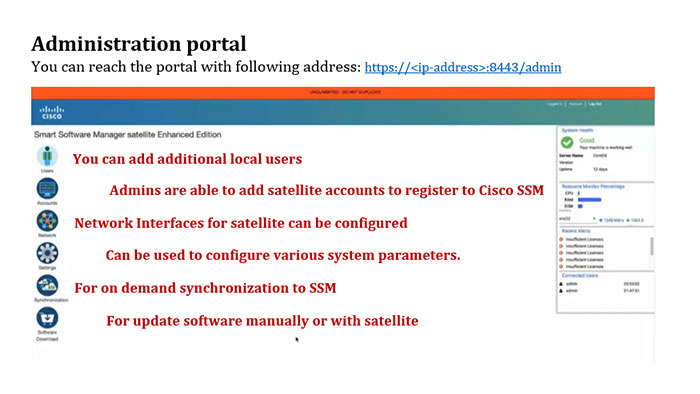
Administration portal
You can reach the portal with following address:
https://<ip-address>:8443/admin
Smart Software Manager
Licensing Portal
You can reach the portal with following address:
https://<ip-address>:8443